Basic Usage
In this tutorial, we will go through the steps of loading, visualizing and annotating ultrasound sweeps in the ImFusion Suite. An ultrasound sweep is essentially the combination of a set of 2D images (“frames”), a tracking sequence and a frame geometry. We will also cover how to inspect and apply basic modifications to these underlying data.
Loading a Sweep
We will use the sweep stored in liver_sweep.imf, which is available from the Public Ultrasound Demos repository on GitHub.
The simplest way to load an ImFusion file (.imf) is to drag and drop it into the ImFusion Suite.
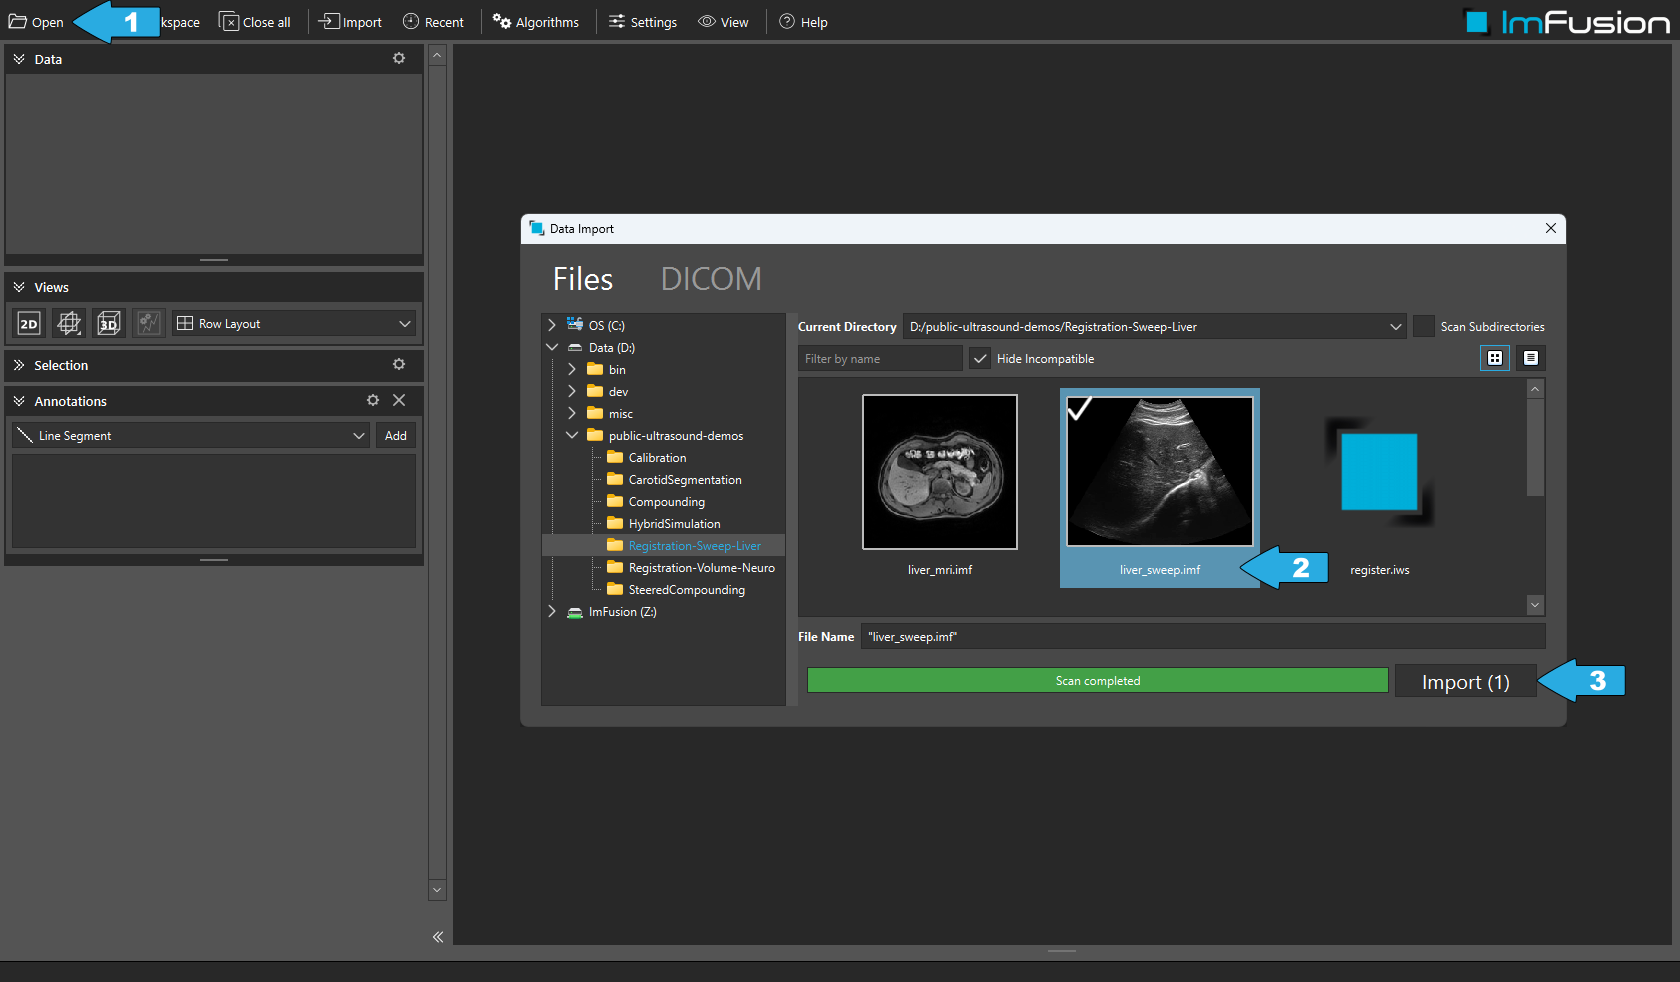
Loading an ultrasound sweep using Open.
Alternatively, we can use Open (1), select the file (2) and click Import (3).
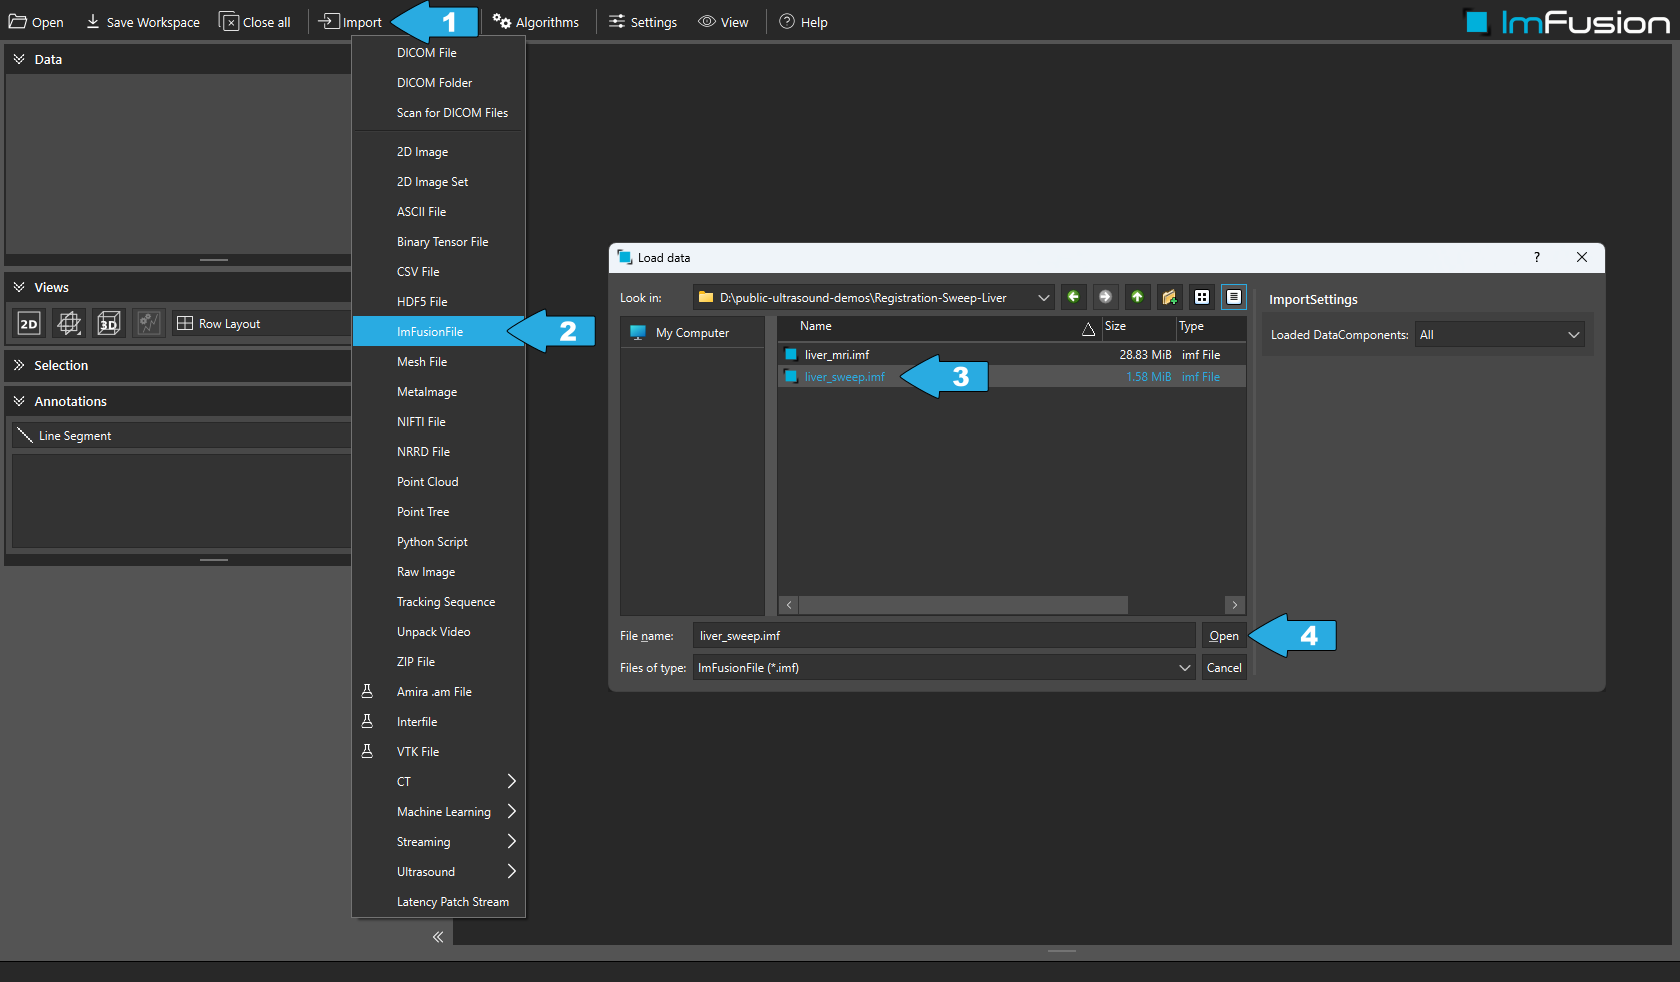
Loading an ultrasound sweep using Import.
A third way is to use Import (1) > ImFusionFile (2), select the file (3) and click Open (4).
Visualizing a Sweep
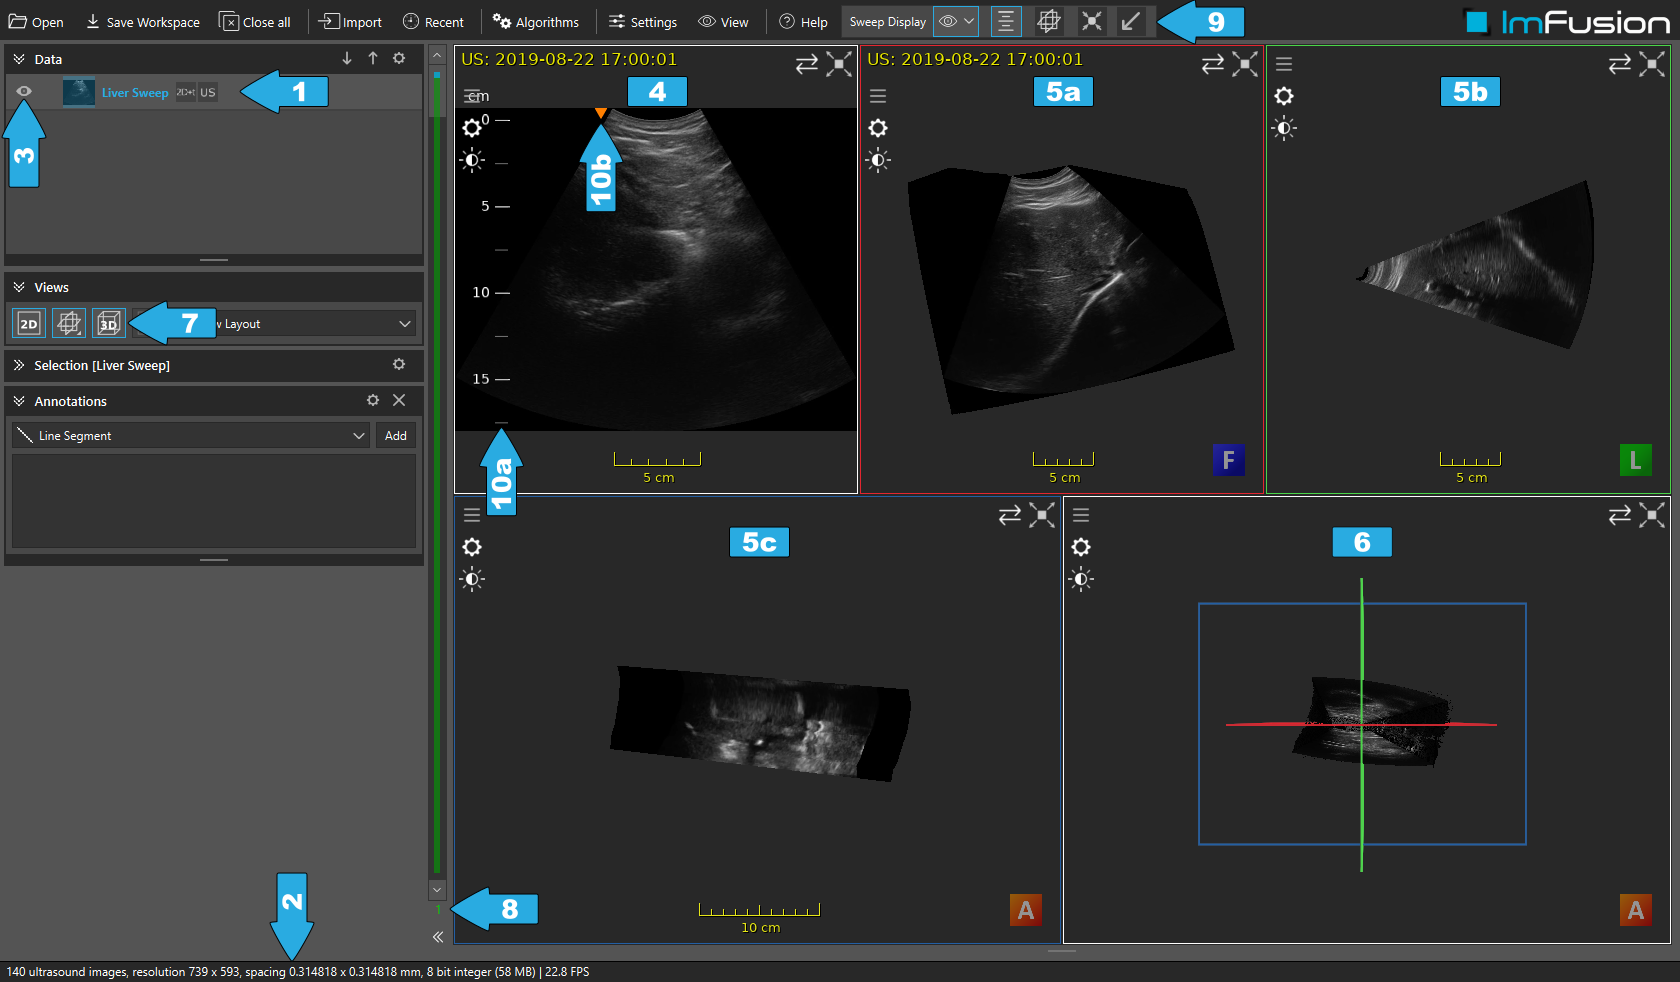
The ImFusion Suite after loading the sweep.
After loading, the sweep is listed in the data widget (1). While selected there, a description is shown in the status bar (2), providing information about the number of frames, image dimensions, spacing, pixel type and frame rate. Whether the sweep is visible in any view is indicated by the eye icon (3) and can be changed by clicking on this icon. By default, 5 views are opened: A 2D view (4), three multiplanar reconstruction (MPR) views (5a-c) and a 3D view (6). The views can be selected in the view layout widget (7). The 2D view always shows the focus frame (8), which can be changed using the vertical scroll bar or by using the mouse wheel in the 2D view. The sweep display data controller (9) offers further options on how the sweep is displayed:
The first button shows/hides the sweep in the MPR views and/or the 3D view.
The second button shows/hides the ultrasound ruler (10a), which also includes a small triangle as orientation indicator (10b).
The third button links the MPR views with the focus frame as illustrated in the animation below. When the MPRs are linked, the MPR view with the red outline will be kept aligned with the focus frame and similar to the 2D view, it will contain the ruler and using the mouse wheel in this view will change the focus frame.
The fourth button centers the sweep in the MPR and 3D views.
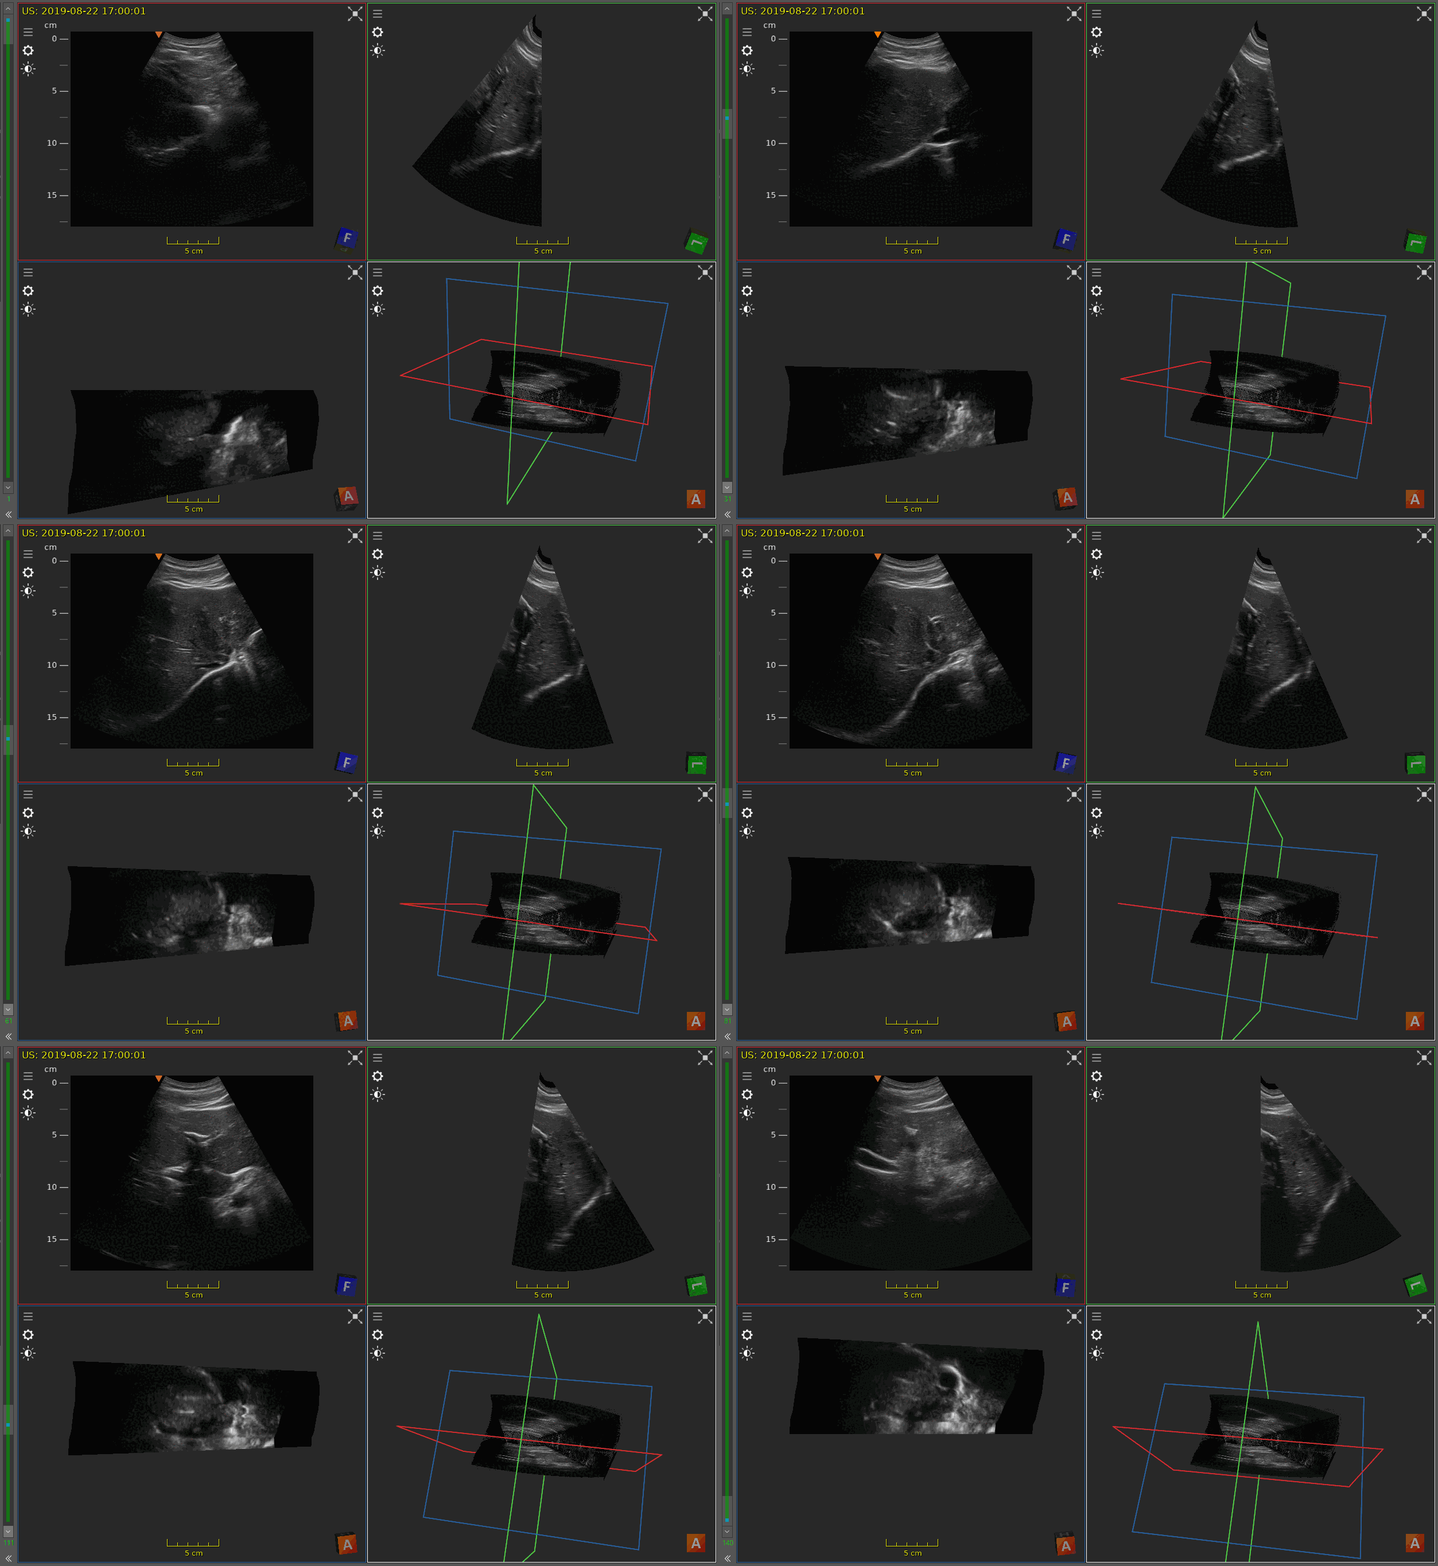
Changing the focus frame while the MPRs are linked.
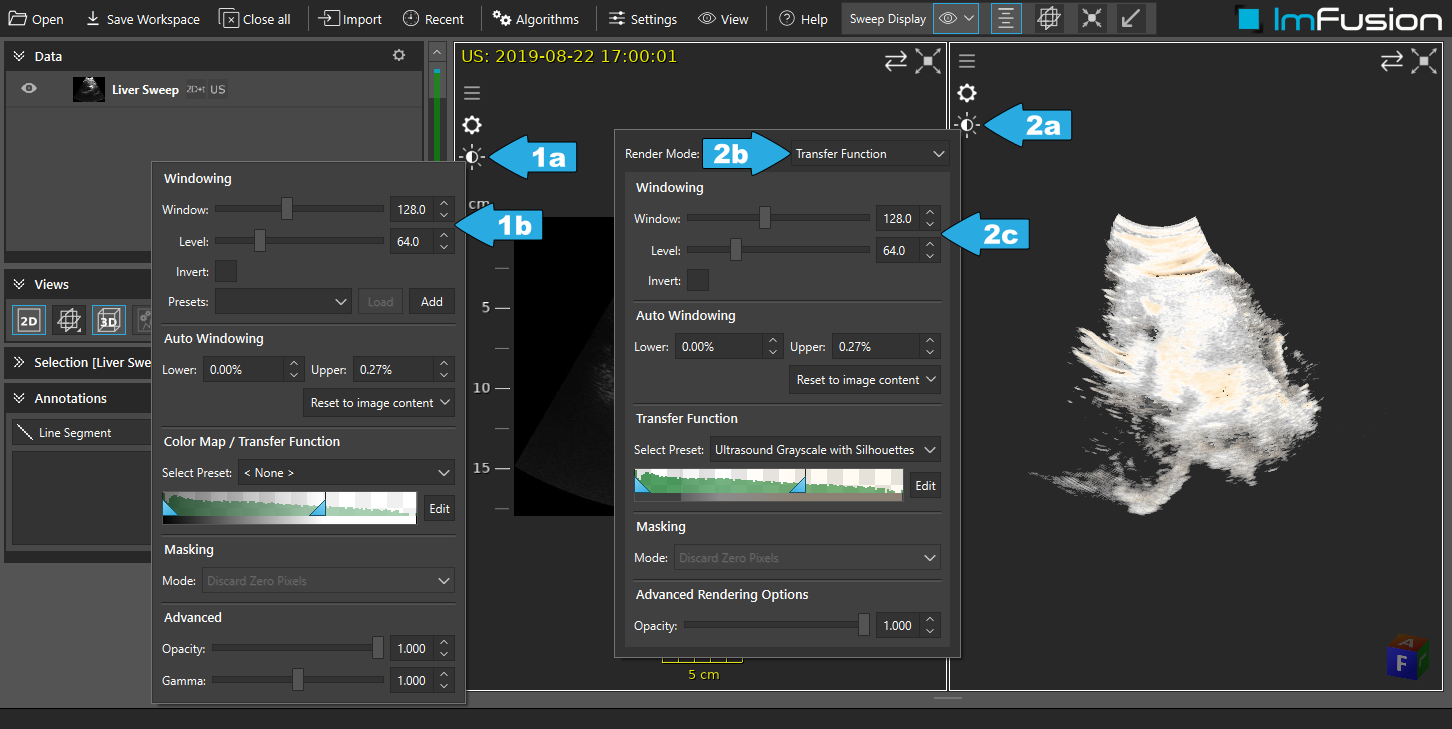
Adjusting the transfer function for the 2D (1a-b) and 3D (2a-c) view.
The transfer function used for rendering the sweep can be adjusted separately for the 2D/MPR views and the 3D view: We first select the sun icon in the respective type of view (1a, 2a) and then change the windowing settings, etc. (1b, 2c). For the 3D view, we might have to change the Render Mode to Transfer Function first (2b).
Annotating a Sweep
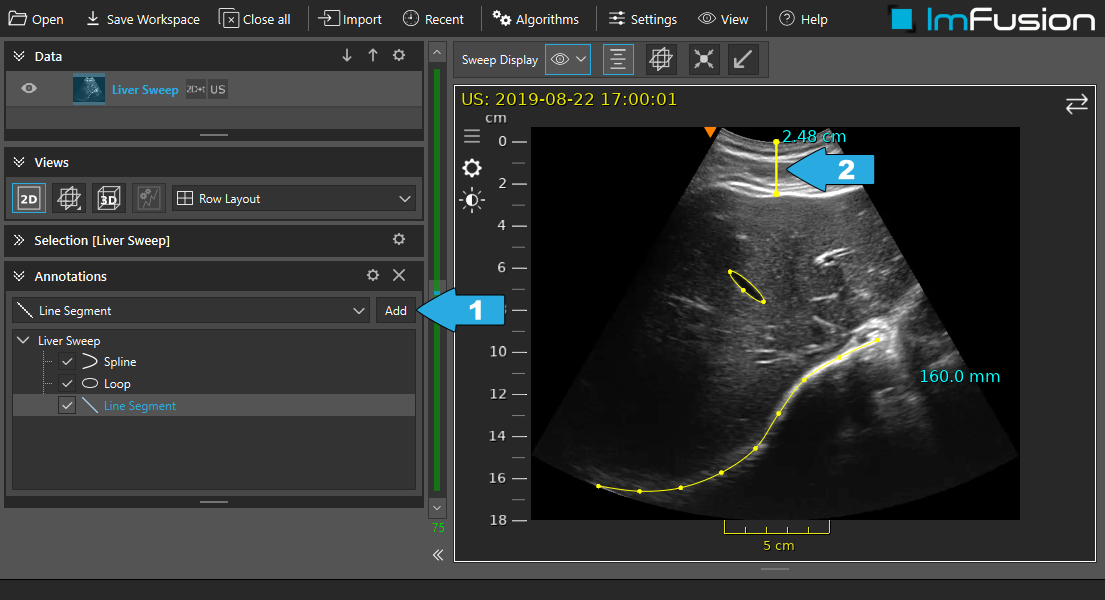
Placing point-based annotations on a frame in the 2D view.
To add annotations to a sweep, we first have to make sure the sweep is selected in the data widget (otherwise we will obtain a Global Annotation). Then we select the type of annotation and click Add in the annotation widget (1). For point-based annotations, we then have to place one or multiple points in the 2D or MPR views using the left mouse button (2). For annotations for which the number of points is not predefined (splines, loops, polylines, etc.), we have to place the last point using the right mouse button. In the image above, we have used a spline to annotate the posterior liver boundary, a loop to annotate a vessel cross-section and a line to measure the depth of the anterior liver boundary.
Annotations are always assigned to the focus frame. Points placed in the 2D view will be in image coordinates, while points placed in the MPR views will be in world coordinates. If we want the annotation to update when the sweep’s global pose (registration matrix) is changed, we have to right-click the annotation and enable Link Pose With Parent.
Reducing a Sweep to a Selection of Frames
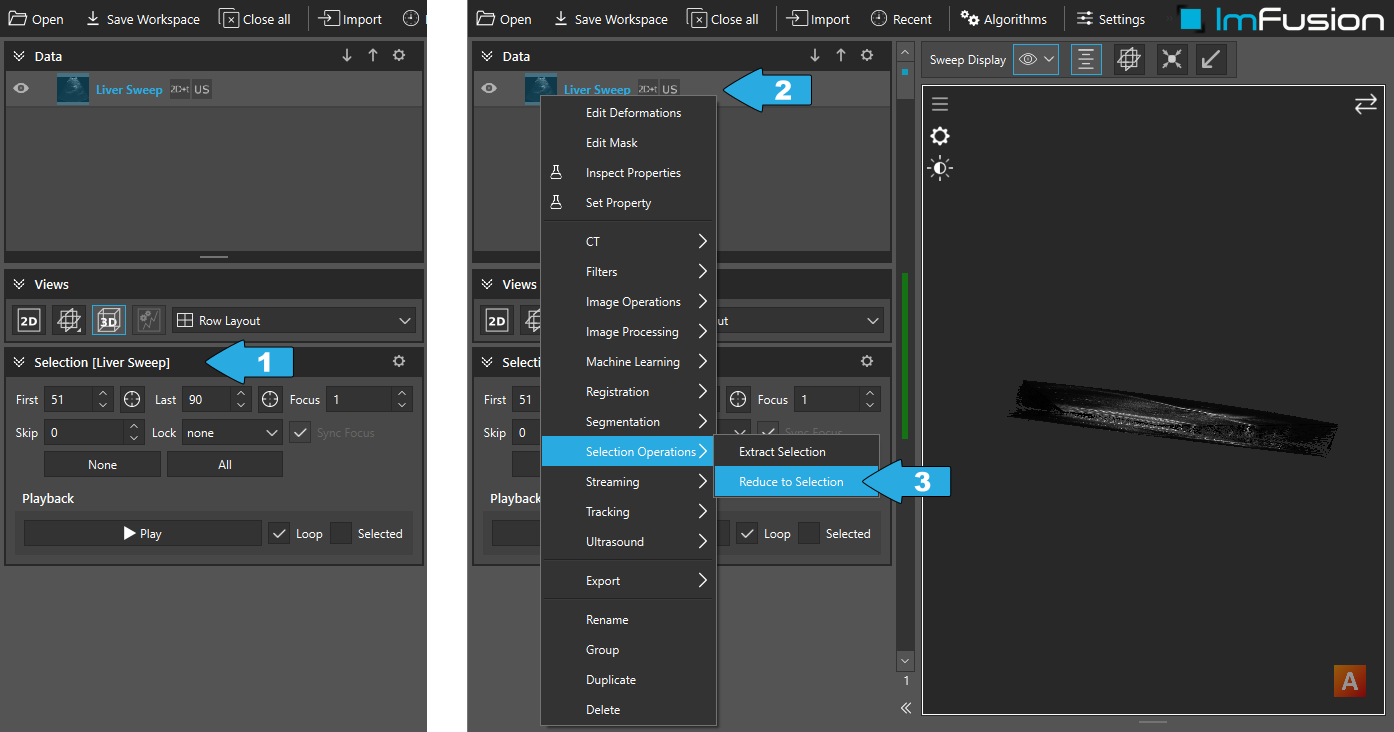
Reducing a sweep to the central 40 frames.
A very common operation is to reduce the sweep to a selection of frames. To do this, we first expand the selection widget (1) and define a selection by setting the First, Last and Skip values. Lock can be used to link the focus frame with the first or last frame of the selection, or both to select a single frame. In the image above, we have selected the 40 central frames. Notice that the 3D view now only shows these selected frames. Then, we right-click the sweep in the data widget (2) and select Selection Operations > Reduce to Selection (3). After that, the description in the status bar will show the new number of frames.
Inspecting a Sweep’s Tracking Sequence(s)
For defining the spatial position and orientation of its frames, a sweep normally has at least one tracking sequence (see also Image Pose Look-up). A tracking sequence consists of metadata about the tracking instrument, a calibration (spatial calibration matrix and temporal calibration offset), a registration matrix and tracking samples (pose matrices with optional timestamps and quality values).
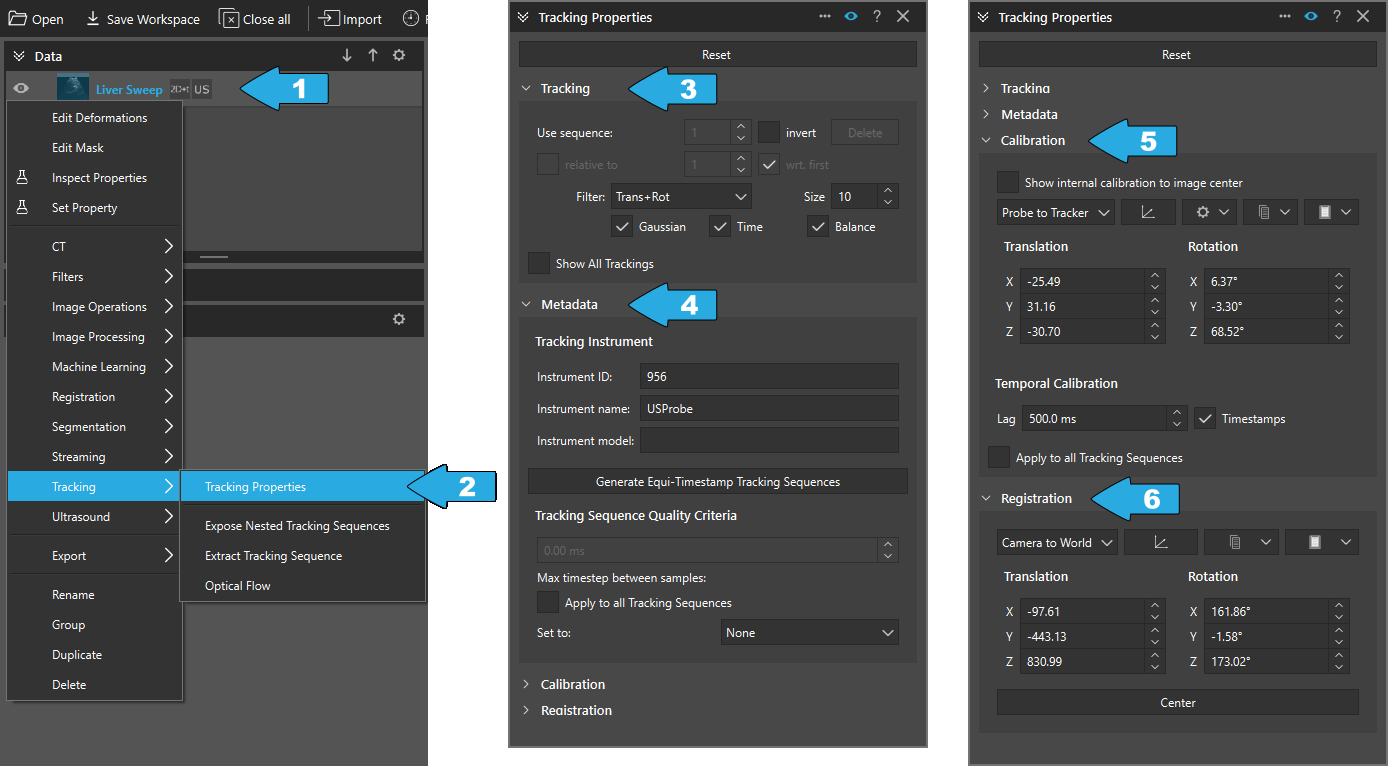
Tracking properties.
Apart from the individual tracking samples, this information is accessible through the tracking properties, which we can open by right-clicking the sweep in the data widget (1) and selecting Tracking > Tracking Properties (2). In the section Tracking (3), we can see or set the currently used tracking sequence and its filtering settings. In the sections Metadata (4), Calibration (5) and Registration (6), we can then inspect or modify the respective information for the currently used tracking sequence.
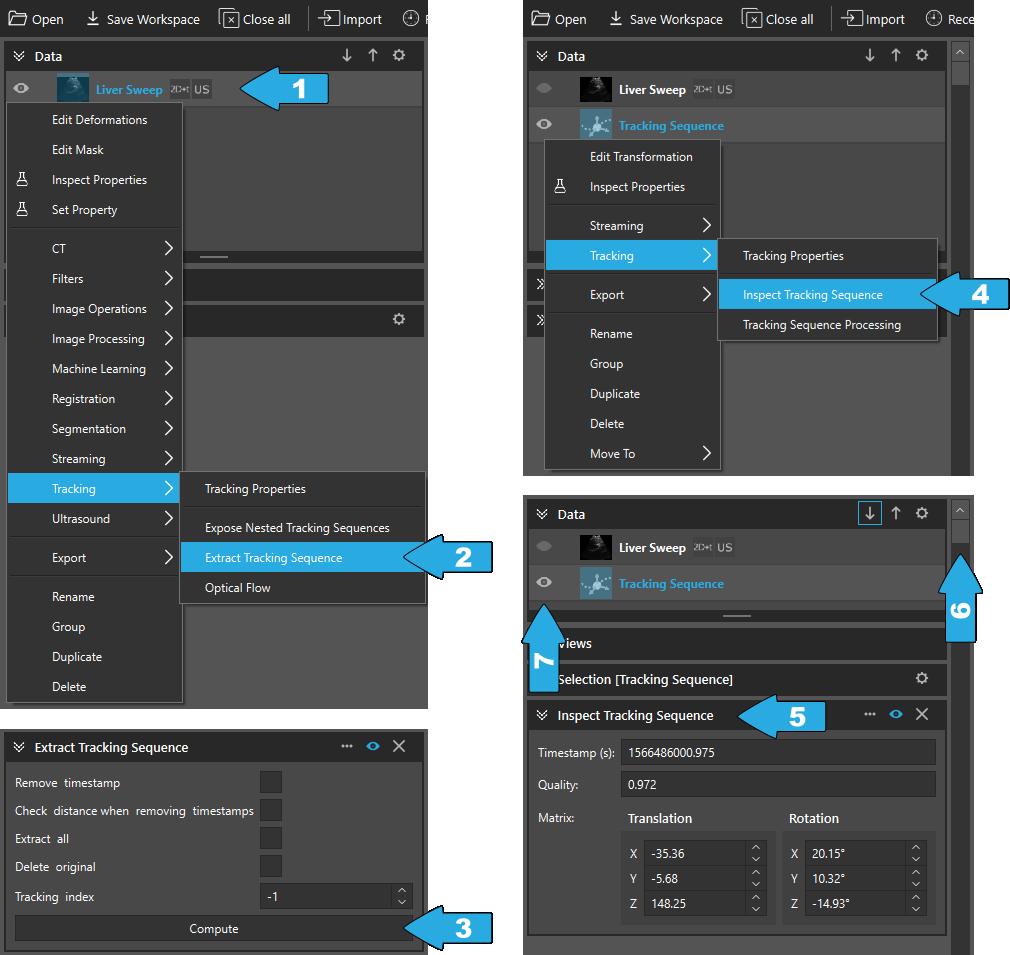
Inspecting the samples of a tracking sequence.
To inspect the individual tracking samples, we first have to expose or extract the tracking sequence(s) (1-3) and then open Inspect Tracking Sequence (4). This will show the timestamp, the quality and the pose matrix (after application of the calibration and registration matrices) of the selected sample (5). We can use the vertical scroll bar to select a sample (6). As the sweep may have a different number of frames than the tracking sequence has samples, it’s best to make sure that only the tracking sequence is set to visible (7) to select a sample.
Inspecting a Sweep’s Frame Geometry
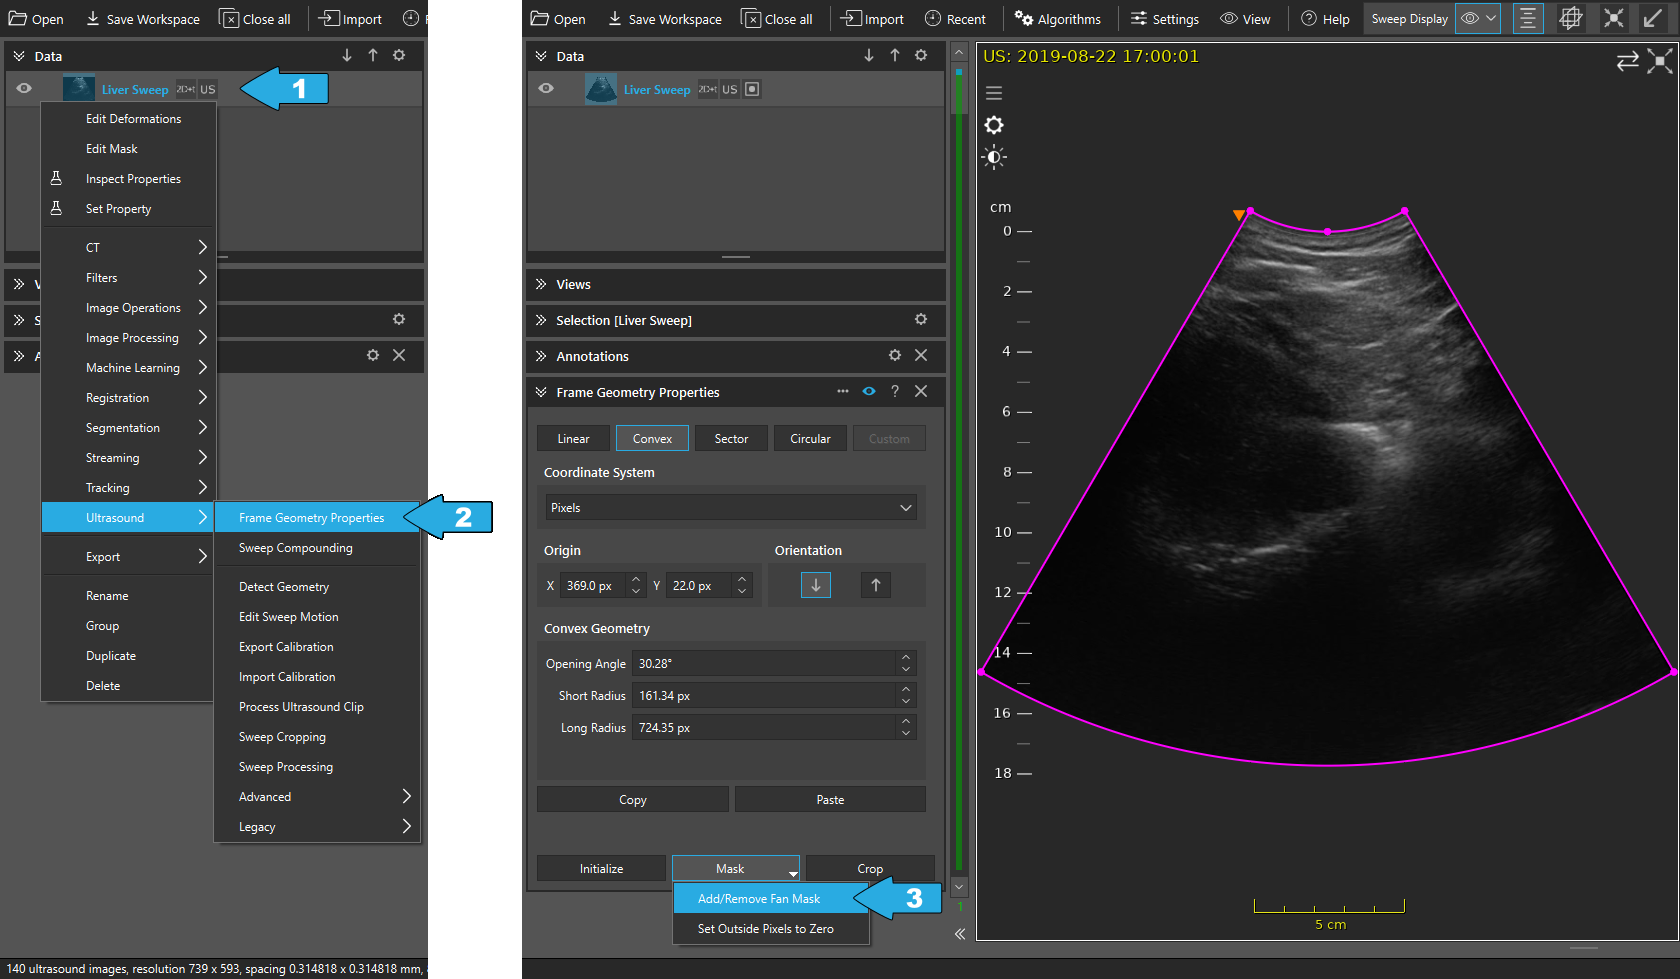
Frame geometry properties.
To inspect or modify the frame geometry, we have to right-click the sweep (1) and select Ultrasound > Frame Geometry Properties (2). The resulting controller allows to define the type of frame geometry, adjust its parameters and to mask the pixels outside the frame geometry (3). While this controller is open, a pink outline is rendered in the 2D and 3D view, which can also be dragged in the 2D view for visual adjustment of the frame geometry.