Ultrasound Registration
Ultrasound registration is the process of aligning ultrasound sweeps or 3D ultrasound volumes with images from other modalities, such as CT or MRI, to combine complementary information for improved diagnosis, treatment planning, or guidance. This is particularly useful in clinical scenarios where real-time ultrasound data needs to be correlated with preoperative or anatomical reference images.
Note: Registration between two ultrasound sweeps (Ultrasound-to-Ultrasound registration) is available as “Sweep Registration” and will not be covered in this tutorial.
Registering ultrasound to other modalities presents unique challenges. Ultrasound images often have lower contrast, more noise, and artifacts compared to CT or MRI. Differences in patient positioning, probe pressure, and tissue deformation can introduce inconsistencies between datasets. Additionally, the limited field of view and variable image quality in ultrasound make robust and accurate registration difficult. Careful parameter selection and validation are essential to achieve reliable results.
In this tutorial, we will explore how to register an ultrasound sweep of the abdomen to an MR volume of the same healthy volunteer with the Ultrasound Plugin of the ImFusion Suite. We will cover the following steps:
Data loading: Loading an ultrasound sweep and an MR volume.
Data exploration: Exploring and visualizing the loaded sweep and volume to understand their orientation and anatomical coverage.
Registration: Running the registration algorithm to align the sweep with the volume, covering rigid alignment and modeling of deformations.
Result analysis: Exploring the results with useful tools like MPR linking, color blending, and switching between registration results.
Saving and export: Saving the results for future use.
Data loading
The data used in this tutorial is available from the ImFusion public GitHub repository. For this tutorial, we will use the liver_mri.imf and liver_sweep.imf.
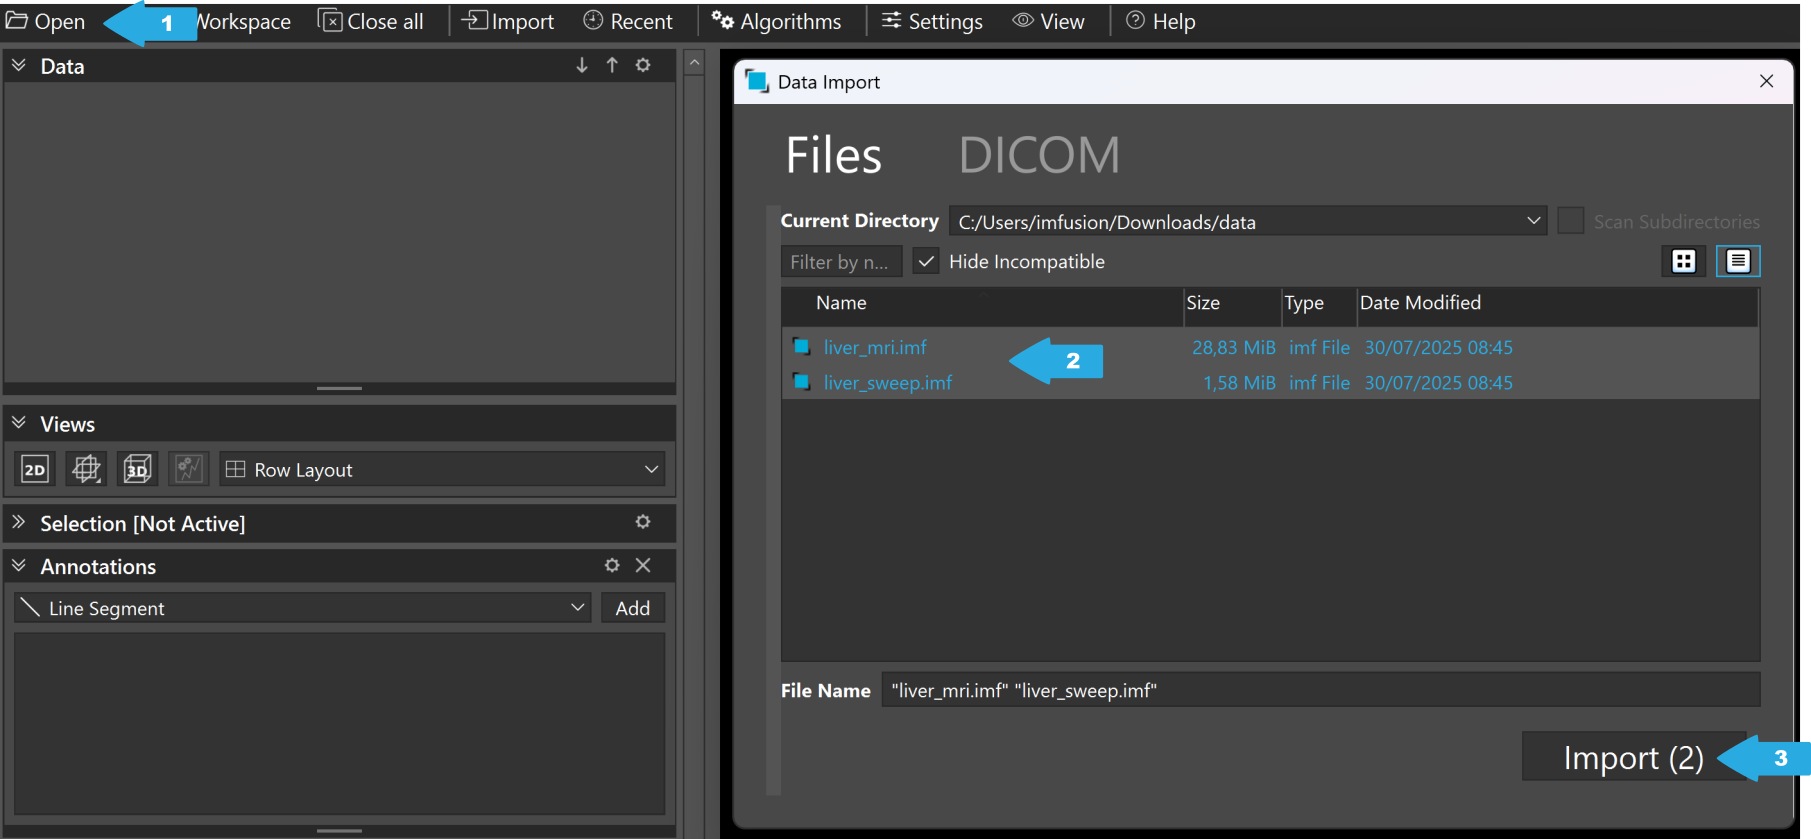
Loading data into the ImFusion Suite.
To load the data, we simply drag and drop the files into the ImFusion Suite, or click Open (1) > select the files (2) > Import (3).
Data exploration
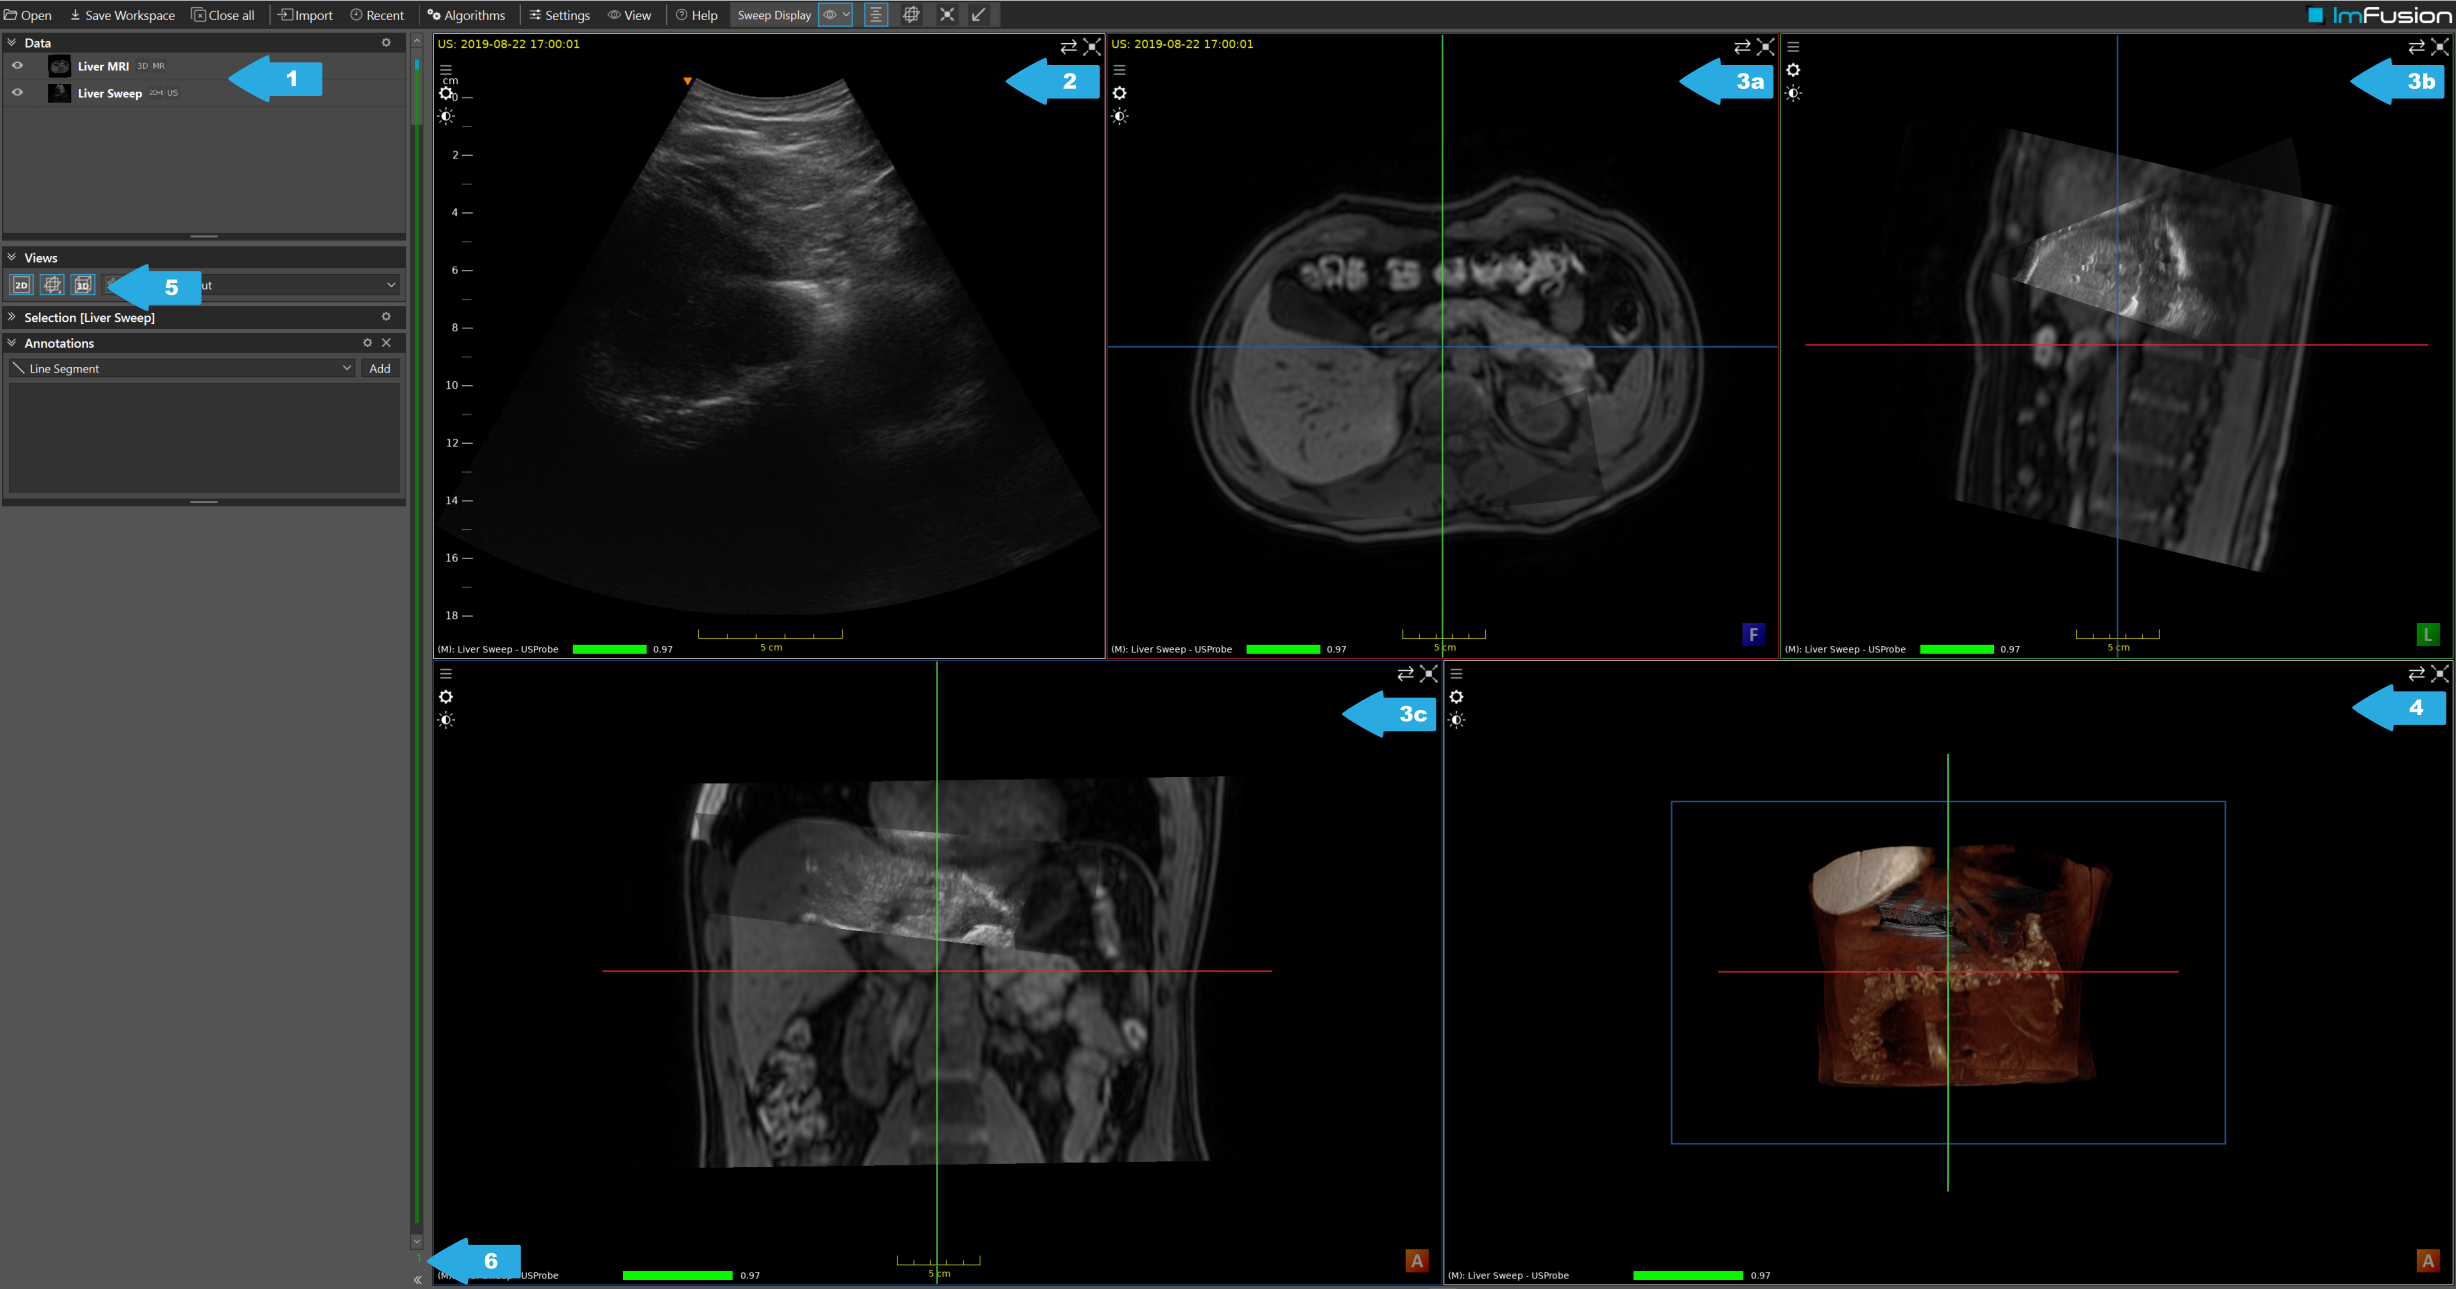
The ImFusion Suite after loading the data.
After loading the data, we will see a list of loaded data (1), a 2D view of the ultrasound sweep (2), three 2D Multiplanar Reconstruction (MPR) views (3), and a 3D view of the MR volume and the sweep (4). We can activate or deactivate views via the Views controller (5). The number in (6) tells you which frame of the ultrasound sweep is currently displayed.
Scrolling through the data
Using our mouse-wheel on the 2D views, we can scroll through the sweep and volume.
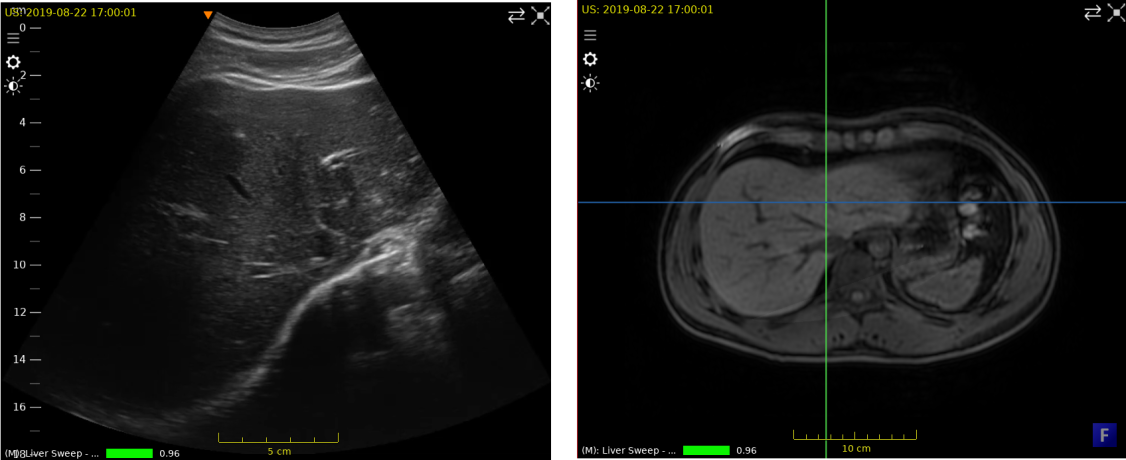
Ultrasound frame (left) and MPR view of the MR volume (right).
Scrolling e.g. to frame 78 in the ultrasound sweep, we will clearly see some liver vessels and the boundary between the liver and surrounding tissues in the 2D view. Scrolling e.g. through MPR view (3a), we will find a similar view of the liver in the MR volume.
Blending
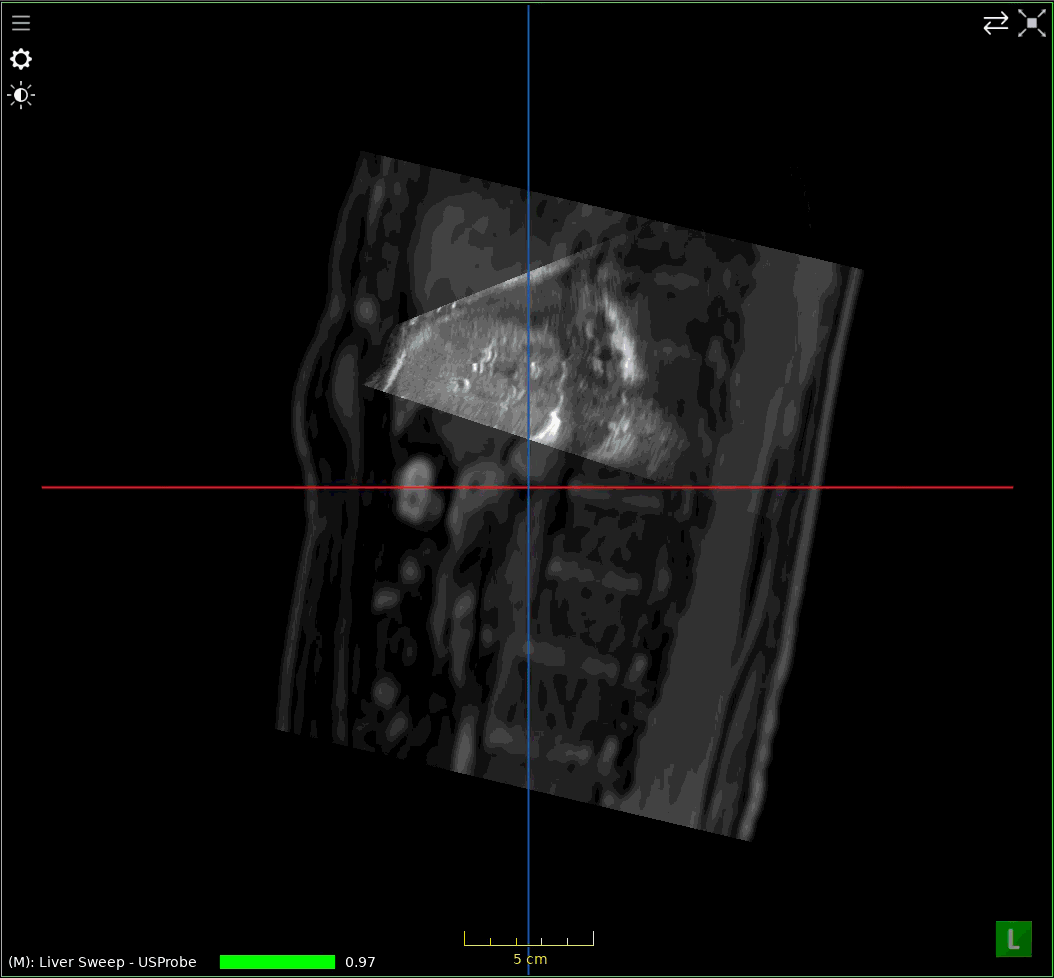
In the Sagittal MPR view (3b), we can see the ultrasound sweep on top of the MR volume.
Blending of the MR volume and ultrasound sweep via Alt + Left-click and mouse drag.
To better visualize the alignment between the ultrasound sweep and the MR volume, we press Alt + Left-click and drag the mouse left or right to adjust the blending between the two images.
Opening the registration results controller
We should also open the Registration Results controller, which will become handy later in this tutorial: Right-click on an empty space in the Data controller (1) and select Registration > Registration Results. Next, we select the data (2) whose pose we wish to store, and click (3) to add it to the registration results. This stores the current pose (before registration), such that we can later compare our new registrations against it.
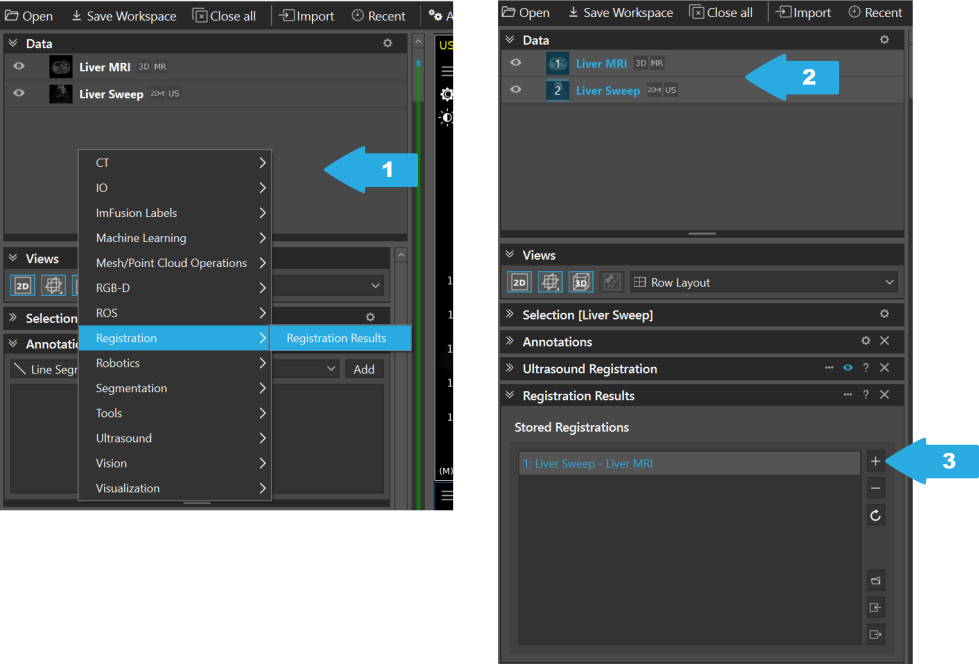
Opening the Registration Results controller (left). Pose storing of the selected data (right).
We will explore the functionality of this controller later in this tutorial.
Registration
From visual data exploration, we observe that the ultrasound sweep is already roughly pre-aligned to the MR volume. A good initial alignment increases the chances of successful registration and reduces the risk of the algorithm getting stuck in an incorrect solution.
Data pre-alignment
If datasets are not already roughly aligned, we can consider one of the following strategies before running the registration algorithm:
We Right-click on an empty space in a view (1) and select Move images > Live MRI (2), which allows us to shift (Right-click + drag) and rotate (Ctrl + Left-click + drag) the selected image.
We can also achieve pre-alignment more systematically by defining point correspondences: Select both datasets in the Data controller and select Ultrasound > Sweep to Volume Point Correspondences.
Alternatively, we can manually adjust the alignment via a Right-click on the MR volume in the Data controller (3) and selecting Edit Transformation (4). This opens the transformation editor (5), where we can interactively modify translation and rotation values.
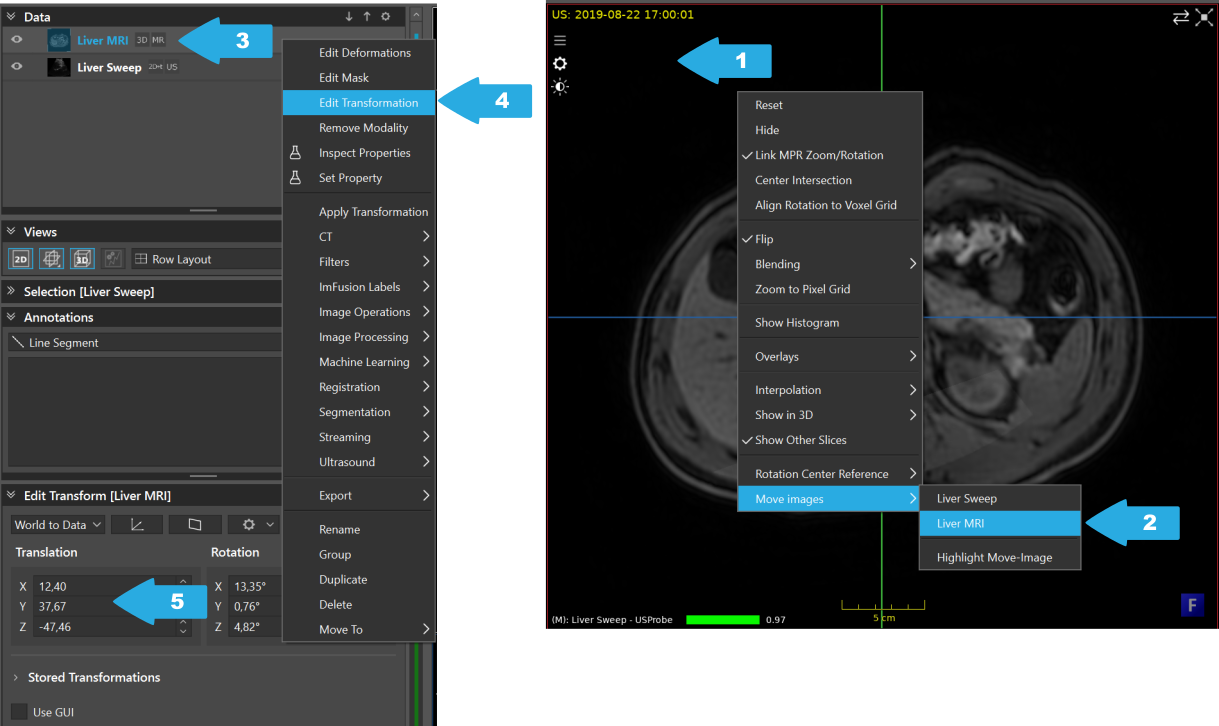
Changing the transformation matrix (left). Interactively moving an image (right).
Running the registration algorithm
Once we are confident that the datasets are roughly pre-aligned, we open the registration algorithm by selecting the datasets we want to register (1), and then Right-click > Ultrasound > Ultrasound Registration
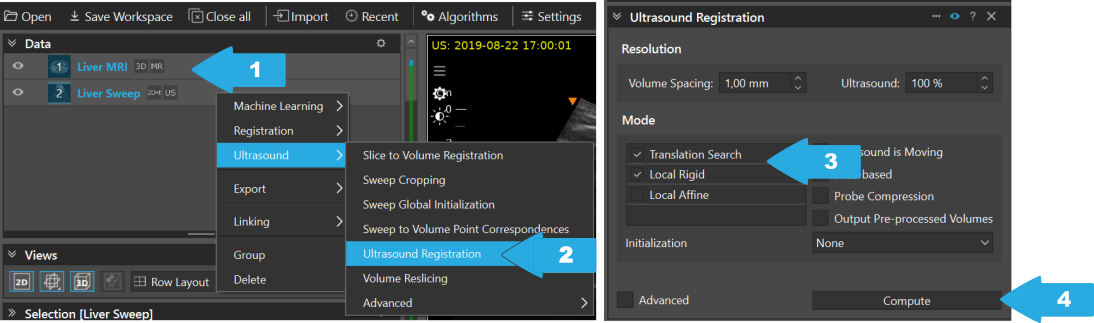
Opening the ultrasound registration algorithm controller (left). The ultrasound registration controller (right).
For a comprehensive overview of all parameters and advanced features, refer to the algorithm reference page. In this tutorial, we will focus on the essential steps for performing a basic registration.
We will configure the algorithm to first perform a coarse translation search to improve the general alignment, followed by a local rigid registration to refine the pose. This can be achieved by checking the options Translation Search and Local Rigid (3). To start the algorithm, we press Compute (4).
We will see how the MR volume starts to move, which is the visual feedback of the current pose after a given optimization step. We can also keep the MR volume fixed and have the ultrasound sweep moving by checking Ultrasound is Moving.
To further improve the registration, it can be beneficial to account for local tissue deformation caused by probe pressure during ultrasound acquisition. Potentially, this leads to an anatomically more accurate alignment. To achieve this, we check the Probe Compression option, uncheck Translation Search (we already have a good initial alignment), and press Compute again.
Result analysis
Now, let’s explore the results of the registration.
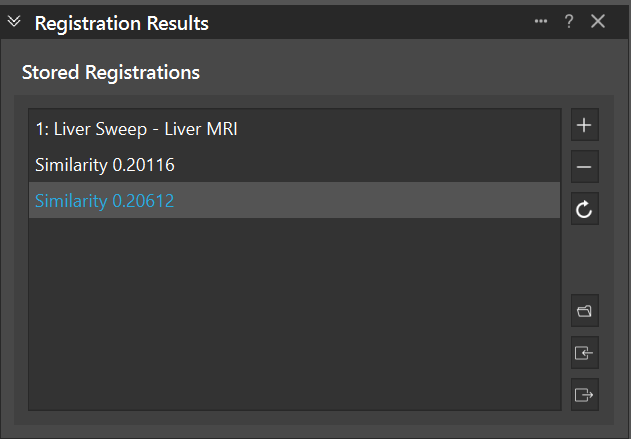
Registration results controler with stored poses.
In the Registration Results controller, we can see three entries, corresponding to the initial pose we manually stored after data loading, the alignment after the rigid registration (translational search + local rigid) and the alignment after the deformable registration (probe compression + local rigid). For the registrations, we also see the value of the similarity metric, which provides an indication of the quality of the registration (higher is better). Note that the similarity metric is not always the best indicator of the quality of the registration. Therefore, it is recommended to visually inspect the results, especially in regions of interest.
By clicking on the entries in the Registration Results controller, we can switch between the different registrations, enabling straightforward visual comparison of the different results. This helps us assess how each registration step affects the alignment and identify which configuration provides the best anatomical match.
When analyzing registrations of ultrasound sweeps, it is beneficial to link the MPR views to the sweep pose by clicking the Link MPRs button (1).

Link MPR views to sweep pose.
Furthermore, we can activate Color Blending for improved visualization by clicking on an empty space in a view (1) and selecting Blending > Color Blending (2).
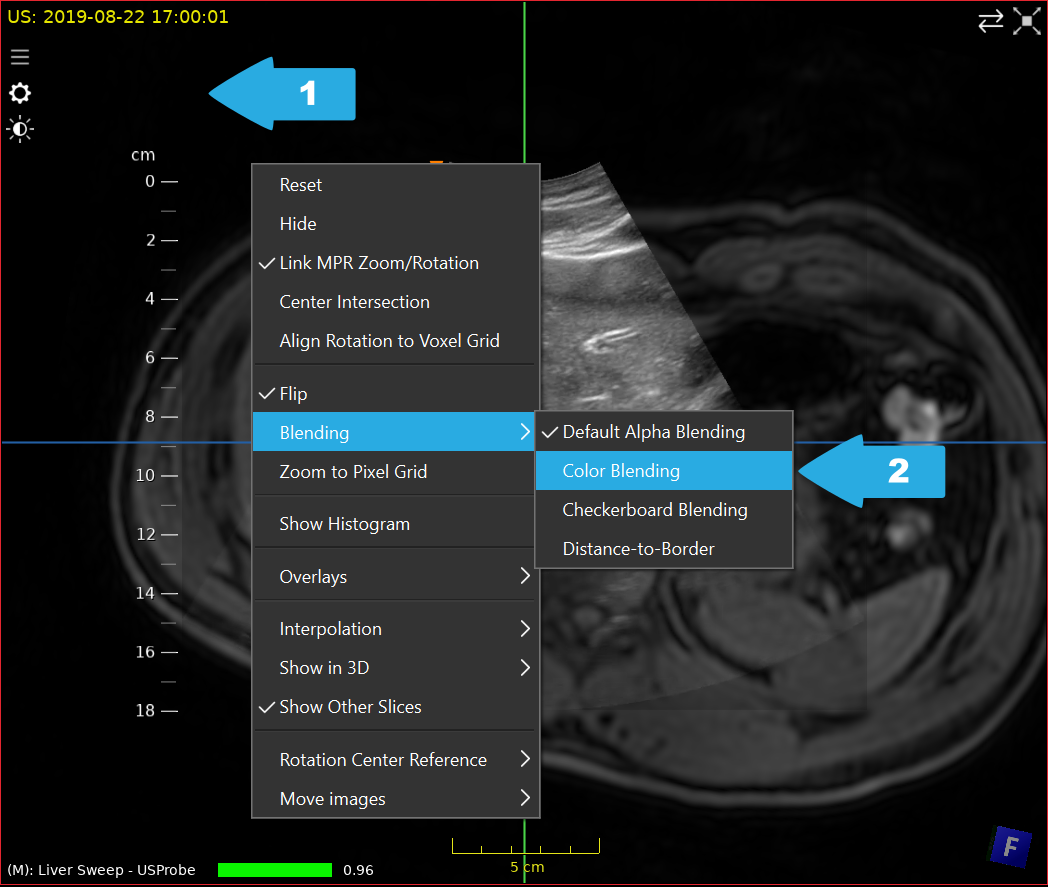
Activation of color blending.
Through scrolling and blending, we can assess the alignment of the ultrasound sweep with the MR volume.
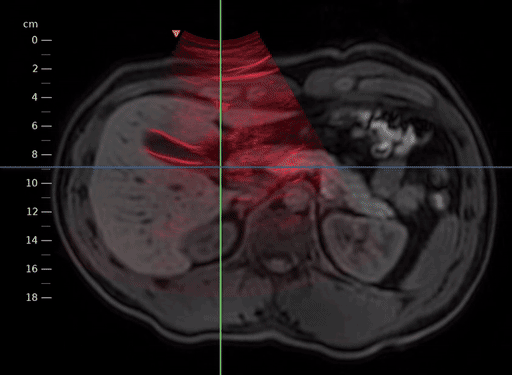
Registered MR volume blended with the ultrasound sweep.
Saving and export
Finally, we want to save our results for future use. We have multiple options do so:
Save the registration results, including poses and deformations, as a standalone file by clicking the respective button (1a) in the Registration Results controller. The saved file will also include data references, enabling retrieval of the used data later.
Save the current state of the ImFusion Suite (such as loaded data and executed algorithms) to restore the session later by clicking Save Workspace (1b).
Export the data with its current poses and deformations by Right-clicking on the data of interest (or on multiple selected datasets) in the Data controller, then selecting > Export > ImFusionFile (1c).
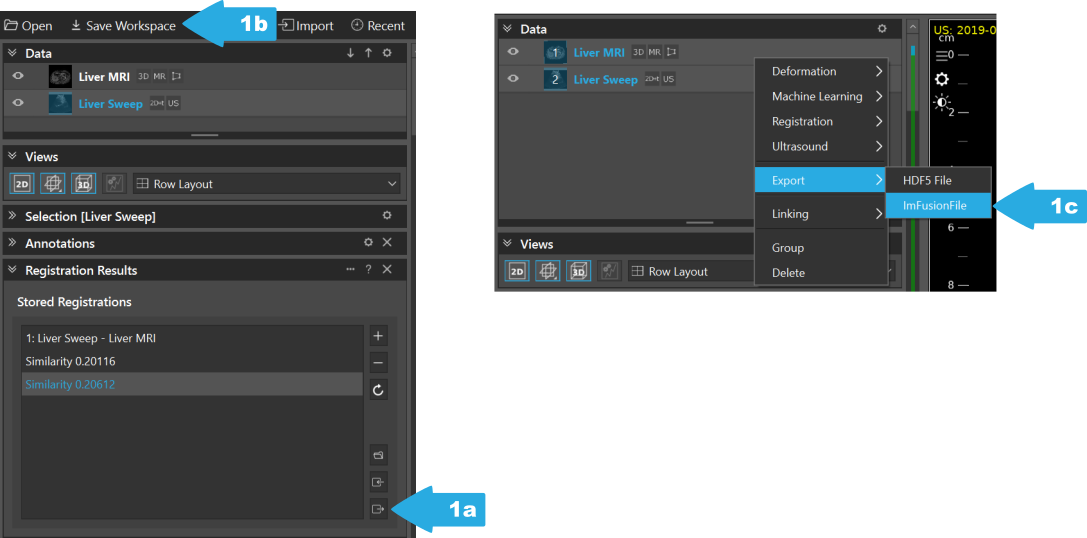
Options for saving the entire workspace (1a), saving the registration results (1b), and exporting data (1c).
We encourage you to experiment with different registration settings and exploration of the visualization tools provided in the ImFusion Suite to optimize your workflow. For further information, consult the algorithm reference page and feel free to reach out to the ImFusion community for support. We are happy to help!