Writing Algorithms
In Running Algorithms, you already saw how to execute algorithms on images. This chapter will teach you how to write your own algorithm that will also show up in the ImFusionSuite GUI.
Minimal Example
An algorithm always has to derive from Algorithm. The minimal
implementation looks like this:
>>> class MyAlgorithm(imfusion.Algorithm):
...     def __init__(self):
...         super().__init__()
...
...     @classmethod
...     def convert_input(cls, data):
...         if len(data) == 0:
...             return []
...         raise IncompatibleError('Requires no input data')
...
...     def compute(self):
...         pass
Warning
Make sure that your __init__ method always starts with super().__init__().
This initializes the underlying C++ object and will lead to undefined behaviour
if not called.
In order to use your new algorithm from the GUI, it has to be registered:
>>> imfusion.register_algorithm('MyAlgorithm', 'My Algorithm', MyAlgorithm)
The first argument is the algorithm’s id, which will be automatically prepended with PYTHON., denoting the respective module.
The second argument is the name of the algorithm as it will appear in the GUI. After registration, the given algorithm will
be accessible through the SDK as PYTHON.MyAlgorithm. For unregistering the algorithm you can either use the algorithms original
id or the algorithm id with PYTHON. prefix.
The most noteworthy method in the previous implementation is probably the convert_input().
If the Algorithm is created through the framework, this classmethod is called to determine if the algorithm is compatible with the desired input data.
If this method does not raise an exception, the algorithm is initialized
with the data returned by convert_input(). The implementation is
similar to this:
try:
    input = MyAlgorithm.convert_input(some_data)
    return MyAlgorithm(*input)
except IncompatibleError:
    return None
convert_input() should only ever succeed if the given data matches exactly the allowed input for the algorithm. For example, if the algorithm expects a single image, convert_input() should fail if called with two images.
The exception message can be used to indicate to the user why the algorithm could not be instantiated.
You can check any property of the given Data.
For example, an algorithm that requires a 3D volume and a label may look like this:
>>> class MyAlgorithm(imfusion.Algorithm):
...     def __init__(image, mask):
...         super().__init__()
...
...     @classmethod
...     def convert_input(cls, data):
...         if len(data) != 2:
...             raise IncompatibleError('Requires two inputs')
...         image, mask = data
...
...         if (not isinstance(image, imfusion.SharedImageSet)
...            or image.img().dimension() != 3):
...             raise IncompatibleError('First input must be a volume')
...
...         if (not isinstance(mask, imfusion.SharedImageSet)
...            or mask.modality != ImFusion.Data.Modality.LABEL):
...             raise IncompatibleError('Second input must be a label map')
...
...         return {'image': image, 'mask': mask}
...
...     def compute(self):
...         pass
The above example returns a dictionary with keys matching the keyword arguments of the constructor. This is especially useful if your algorithm requires multiple or optional arguments for initialization.
For performance reasons, you should refrain from running any heavy computations inside convert_input().
Generating output
Let’s create a slightly more useful algorithm that expects one input image and creates a thresholded version of the input as output.
>>> class MyAlgorithm(imfusion.Algorithm):
...     def __init__(self, imageset):
...         super().__init__()
...         self.imageset = imageset
...         self.imageset_out = imfusion.SharedImageSet()
...
...     @classmethod
...     def convert_input(cls, data):
...         if len(data) == 1 and isinstance(data[0], imfusion.SharedImageSet):
...             return data
...         raise IncompatibleError('Requires exactly one image')
...
...     def compute(self):
...         # clear output of previous runs
...         self.imageset_out = imfusion.SharedImageSet()
...
...         # compute the thresholding on each individual image in the set
...         for image in self.imageset:
...             arr = np.array(image) # creates a copy
...             arr[arr < 2500] = 0
...             arr[arr >= 2500] = 1
...
...             # create the output image from the thresholded data
...             image_out = imfusion.SharedImage(arr)
...             self.imageset_out.add(image_out)
...
...     def output(self):
...         return [self.imageset_out]
>>> imfusion.unregister_algorithm('MyAlgorithm') # remove the old version
>>> imfusion.register_algorithm('MyAlgorithm', 'My Algorithm', MyAlgorithm)
Let’s try it:
>>> image = imfusion.load(ct_image_png)[0]
>>> output = imfusion.execute_algorithm('PYTHON.MyAlgorithm', [image])[0]
>>> int(np.min(np.array(output[0])))
0
>>> int(np.max(np.array(output[0])))
1
Adding Parameters
Having the thresholding value hardcoded to 2500 is not very useful.
Fortunately, the ImFusion framework provides a powerful dynamic property system
that can also generate basic UIs automatically. To use it, you just have to
declare a parameter with add_param():
>>> class MyAlgorithm(imfusion.Algorithm):
...     def __init__(self, imageset):
...         super().__init__()
...         self.imageset = imageset
...         self.imageset_out = imfusion.SharedImageSet()
...
...         self.add_param('threshold', 2500,
...                        attributes='min: 0, max: 5000')
...
...     @classmethod
...     def convert_input(cls, data):
...         if len(data) == 1 and isinstance(data[0], imfusion.SharedImageSet):
...             return data
...         raise IncompatibleError('Requires exactly one image')
...
...     def compute(self):
...         # clear output of previous runs
...         self.imageset_out = imfusion.SharedImageSet()
...
...         for image in self.imageset:
...             arr = np.array(image)
...             arr[arr < self.threshold] = 0
...             arr[arr >= self.threshold] = 1
...
...             image_out = imfusion.SharedImage(arr)
...             self.imageset_out.add(image_out)
...
...     def output(self):
...         return [self.imageset_out]
>>> imfusion.unregister_algorithm('MyAlgorithm') # remove the old version
>>> imfusion.register_algorithm('MyAlgorithm', 'My Algorithm', MyAlgorithm)
The add_param() method will add a dynamic attribute
named after the first argument (in this case, threshold). The second argument specifies the initial value of the parameter,
and the optional attributes argument lets you customize certain properties of the automatically generated UI,
as further described below.
When an Algorithm is loaded and selected in the ImFusionSuite, the UI opens an algorithm controller
for configuring the Algorithm’s parameters. Each parameter can then be interactively configured
through its widget, which corresponds to the associated parameter type.
For example, the following dummy Algorithm:
>>> class ParametersExampleAlgorithm(imfusion.Algorithm):
...     def __init__(self):
...         super().__init__()
...
...         import pathlib
...
...         self.add_param('Integer', 2500)
...         self.add_param('Floating point', 12.0)
...         self.add_param('String', 'imfusion')
...         self.add_param('Choice picker', imfusion.Properties.EnumStringParam(value='choice2', admitted_values={'choice1', 'choice2'}))
...         self.add_param('Filesystem path', pathlib.Path('./'))
...         self.add_param('Boolean', False)
...
...     @classmethod
...     def convert_input(cls, data):
...         if len(data) != 0:
...             raise imfusion.IncompatibleError('Requires no data')
...         return []
...
>>> imfusion.unregister_algorithm('ParametersExampleAlgorithm') # remove the old version
>>> imfusion.register_algorithm('ParametersExampleAlgorithm', 'Parameters Example Algorithm', ParametersExampleAlgorithm)
generates the following controller:
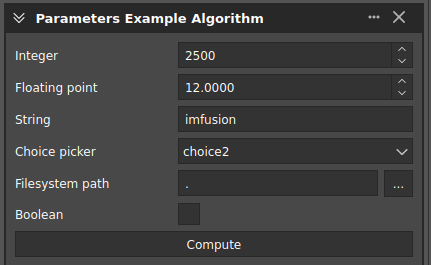
The possible correspondences between widgets and parameter types are:
int: the widget allows integer values and allows to increment or to decrement.float: the widget allows floating-point values and allows to increment or to decrement.str: the widget allows generic text.EnumStringParam: the widget allows to pick a certain value among a set of possible choices.Path: the widget allows to insert a path or to open the file explorer for interactively picking a file or folder.bool: the widget becomes a checkbox.
It is also possible to fine-tune the controllers and its widgets further, through the
param_attributes() mechanism. For further information, please refer
to the Properties class documentation.
Otherwise, for more advanced use cases, please refer to the PropertiesWidget paragraph
of the C++ SDK tutorial Using Properties and Configuration.
Adding Actions
Algorithm actions are a way to interactively call methods other than compute().
When an action is registered to an algorithm, a button is added to its controller. The action will be executed when the user clicks on this button.
Methods are automatically registered as actions when they have the action() decorator.
These methods should return an Status code or nothing (in which case, an UNKNOWN will be implicitly returned).
>>> class CountingAlgorithm(imfusion.Algorithm):
...     def __init__(self):
...         super().__init__()
...
...         self.counter = 0
...
...     @imfusion.Algorithm.action(display_name="Increment Counter")
...     def increment_counter(self):
...         self.counter += 1
...         print('Incremented counter!')
...         return imfusion.Algorithm.Status.SUCCESS
...
...     @classmethod
...     def convert_input(cls, data):
...         if len(data) == 0:
...             return data
...         raise imfusion.IncompatibleError('Requires no data')
...
...     def compute(self):
...         print(f"Counter = {self.counter}")
>>> imfusion.unregister_algorithm('CountingAlgorithm')
>>> imfusion.register_algorithm('CountingAlgorithm', 'My Counting Algorithm', CountingAlgorithm)
It is possible to check the list of registered actions via the property actions.